Linux Installation: A Guide to Getting Started with the Open-Source Operating System
Are you tired of the limitations and restrictions that come with proprietary operating systems? Are you ready to explore the world of open-source software and enjoy the freedom it offers? Look no further than Linux, a powerful and versatile operating system that has gained popularity among tech enthusiasts, developers, and businesses alike. In this article, we will guide you through the Linux installation process, helping you embark on your journey towards a more open and customizable computing experience.
Step 1: Choose Your Linux Distribution
Linux comes in various distributions, each tailored to meet different needs and preferences. Popular distributions include Ubuntu, Fedora, Debian, and CentOS. Research different distributions to find one that aligns with your requirements in terms of stability, user-friendliness, software availability, and community support.
Step 2: Prepare Installation Media
Once you have selected a Linux distribution, download the ISO file from its official website. An ISO file is a disk image that contains all the necessary files for installation. Next, create installation media using a USB drive or burn the ISO file onto a DVD. This will serve as your bootable media for installing Linux.
Step 3: Backup Your Data
Before proceeding with any operating system installation, it is crucial to back up your important data. Although the installation process is generally safe and reliable, unforeseen circumstances can occur. Make sure to create backups of your files on an external storage device or cloud service to avoid any potential loss.
Step 4: Boot from Installation Media
Insert your bootable USB drive or DVD into your computer’s appropriate port. Restart your computer and access the BIOS settings by pressing a specific key (usually displayed during startup) to enter the boot menu. Select the option to boot from external media (USB or DVD), allowing your computer to start up using Linux.
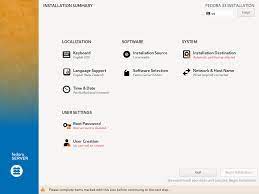
Step 5: Follow Installation Wizard
Once the Linux installation media has successfully booted, you will be presented with an installation wizard. Follow the on-screen instructions to select your language, time zone, keyboard layout, and other preferences. You will also be prompted to choose between installing Linux alongside your existing operating system or replacing it entirely. Make your selection based on your needs and comfort level.
Step 6: Partitioning
During the installation process, you will reach a step where you need to partition your hard drive. This involves dividing your storage space into separate sections for the operating system, user files, and potentially other partitions like swap space. If you are new to partitioning, it is recommended to choose the default options or let the installer handle it automatically.
Step 7: Create User Account
Once partitioning is complete, you will be asked to create a user account. This account will serve as your primary login for Linux. Choose a username and password that are secure yet easy for you to remember.
Step 8: Install Additional Software
After creating your user account, the installation process will continue by installing additional software packages that come with your chosen Linux distribution. These packages may include essential utilities, productivity tools, web browsers, media players, and more. You can customize this selection based on your needs or stick with the default options.
Step 9: Complete Installation
Once all necessary software packages have been installed, you will receive a notification that the installation process is complete. At this point, remove any installation media from your computer and restart it. You should now be greeted with a login screen where you can enter your username and password to access your newly installed Linux system.
Congratulations! You have successfully installed Linux on your computer. Welcome to the world of open-source computing where customization and freedom await you. Take some time to explore the vast array of open-source software available for Linux and join its passionate community of users and developers who continuously contribute towards making Linux better with each passing day. Enjoy your Linux journey!
Advantages of Linux Installation: Security, Affordability, Customization, Stability, Open Source, and Versatility
- Security
- Cost
- Customization
- Stability
- Open Source
- Versatility
Challenges of Linux Installation: Limited Software Availability, Installation Complexity, and Security Risks
- Limited software availability
- Installation complexity
- Security risks
Security
Security: Linux’s Strong Track Record in Protecting Your System
When it comes to operating systems, security is a paramount concern for users. In this regard, Linux stands out as one of the most secure options available. With a strong track record for security, it has gained a reputation for being reliable and resistant to various forms of cyber threats.
One of the main reasons behind Linux’s robust security is its open-source nature. The codebase of Linux is accessible to anyone, allowing a global community of developers to review and contribute towards its improvement. This transparency fosters continuous scrutiny and helps identify vulnerabilities promptly. The collaborative efforts of the Linux community ensure that security patches and updates are released in a timely manner, minimizing the risk of potential exploits.
Additionally, Linux’s architecture follows a principle known as “least privilege.” This means that users have limited access rights by default, reducing the potential impact of malicious software or unauthorized actions. Unlike other operating systems where users often have administrative privileges by default, Linux encourages users to execute tasks with only the necessary level of authority.
Linux also benefits from having fewer malware threats compared to other popular operating systems. While no system is entirely immune to malware, Linux’s design and lower market share make it less attractive to potential attackers. Moreover, the strict package management system employed by most Linux distributions ensures that software installations come from trusted sources and are thoroughly vetted for security.
Another advantage is that Linux offers robust firewall capabilities and built-in encryption tools. These features provide an additional layer of protection against unauthorized access and data breaches. Furthermore, regular updates provided by distributions keep your system up-to-date with the latest security enhancements.
Organizations around the world recognize the reliability and security offered by Linux. It is widely used in critical infrastructure systems such as servers, routers, and firewalls due to its stability and resistance to attacks. The ability to customize every aspect of the operating system allows administrators to tailor their setups specifically for security purposes.
In conclusion, Linux’s strong track record for security is a compelling reason to consider it as your operating system of choice. Its open-source nature, adherence to the principle of least privilege, limited malware threats, robust firewall capabilities, and built-in encryption tools all contribute to its reputation as a secure platform. Whether you are an individual user concerned about protecting your personal data or an organization safeguarding critical systems, Linux offers peace of mind and confidence in the security of your digital environment.
Cost
Cost: Linux is free, so you don’t have to pay for expensive licenses or updates.
One of the most significant advantages of installing Linux as your operating system is its cost-effectiveness. Unlike proprietary operating systems such as Windows or macOS, Linux is completely free to use. This means you can enjoy a powerful and feature-rich operating system without the need to purchase expensive licenses or pay for regular updates.
The freedom from licensing fees allows users to allocate their resources towards other aspects of their computing needs. Whether you are an individual user, a small business, or even a large enterprise, the cost savings associated with Linux installation can be substantial.
Moreover, not only is Linux itself free, but it also provides access to an extensive range of open-source software that can be downloaded and used without any additional costs. This vast ecosystem includes productivity tools, multimedia applications, development environments, web browsers, and much more. With Linux, you have the flexibility to choose from a wide variety of software options that suit your specific requirements.
In addition to the initial cost savings, Linux also eliminates the need for regular paid updates and subscriptions that are common in proprietary operating systems. Updates for Linux distributions are typically released freely by the community and developers who work tirelessly to enhance security features and improve functionality. This ensures that your system remains up-to-date and protected against potential vulnerabilities without any financial burden.
By choosing Linux as your operating system, you not only gain access to a reliable and robust platform but also contribute to the spirit of open-source collaboration. The global community of developers continuously works together to improve Linux based on user feedback and emerging technologies. This collaborative effort results in a high-quality product that is available at no cost.
Whether you are an individual looking for a budget-friendly option or a business seeking cost-effective solutions without compromising performance and security, Linux offers an attractive proposition. Embrace the freedom from licensing fees and enjoy all that this open-source operating system has to offer. Install Linux today and experience the benefits of a powerful, customizable, and cost-efficient computing environment.
Customization
Customization: Unleash Your Creativity with Linux
When it comes to personalizing your computer, few operating systems offer the level of customization that Linux does. With Linux, you have the power to transform your system into a unique and tailored environment that suits your preferences and needs. In this article, we explore how Linux empowers users to customize their system’s appearance and functionality, making it a truly personal computing experience.
One of the key advantages of Linux is its flexibility in terms of customization. Unlike other operating systems that restrict users to predefined themes and settings, Linux provides a plethora of options for tweaking every aspect of your system’s look and feel. From choosing different desktop environments like GNOME, KDE, or Xfce to selecting custom icon sets, window managers, and wallpapers, the possibilities are virtually endless.
Linux also offers a wide range of software packages that can be installed to enhance your computing experience. Whether you are a developer looking for programming tools or an artist searching for graphic design software, Linux has you covered. With its vast software repositories and package managers like apt or dnf, you can easily install applications tailored to suit your specific needs.
One notable advantage of using Linux for customization is the active and passionate community behind it. The Linux community is known for its dedication to developing and sharing themes, icon packs, wallpapers, and other visual elements that can transform your desktop into a stunning work of art. Online forums and communities provide platforms where users can share their creations, seek advice on customization techniques, or simply find inspiration from others’ setups.
Moreover, with Linux being an open-source operating system, users have direct access to the underlying code. This means that if you possess coding skills or have a desire to learn them, you can delve into the intricacies of the system itself. This level of access allows for deep customization beyond just appearance – you can modify system settings, create custom scripts or even develop your own software.
Linux’s customization capabilities not only allow you to express your personal style but also enable you to optimize your system for productivity and efficiency. By tailoring your desktop environment, software selection, and system settings to your workflow, you can create an environment that maximizes your productivity and enhances your overall computing experience.
In conclusion, Linux stands out as a powerhouse of customization. Its open nature, vast software ecosystem, and passionate community make it an ideal choice for users who want to break free from the constraints of mainstream operating systems. Whether you are seeking a visually stunning desktop or a highly efficient work environment, Linux provides the tools and freedom to transform your computer into a reflection of your personality and needs. Embrace the world of Linux customization and unlock endless possibilities for personalizing your computing experience.
Stability
Stability: Linux’s Unwavering Reliability
When it comes to operating systems, stability is a crucial factor that directly impacts user experience and productivity. In this regard, Linux stands out as a shining example of stability and reliability. Unlike some other operating systems that may occasionally crash or become unstable due to errors in the codebase or hardware problems, Linux has earned a reputation for its rock-solid performance.
One of the key reasons behind Linux’s stability lies in its design philosophy. The open-source nature of Linux allows a vast community of developers to scrutinize the codebase, identify potential issues, and collaborate on finding solutions. This collective effort ensures that bugs are quickly identified and resolved, resulting in a more stable operating system.
Moreover, Linux benefits from its modular architecture. The kernel, which forms the core of the operating system, is designed to be lean and efficient. This streamlined approach minimizes unnecessary complexity and reduces the likelihood of system crashes caused by bloated software components.
Additionally, Linux’s robust security measures contribute to its overall stability. With regular security updates and patches released by both the Linux community and distribution maintainers, vulnerabilities are swiftly addressed before they can be exploited. By prioritizing security, Linux provides users with peace of mind while minimizing the risk of system instability caused by malicious attacks or unauthorized access.
Furthermore, Linux’s compatibility with a wide range of hardware configurations adds another layer of stability. The extensive driver support ensures smooth operation across various devices and minimizes compatibility issues that can lead to crashes or instability.
The stability offered by Linux translates into increased productivity for users. Whether you are using your computer for work-related tasks, multimedia activities, or gaming, knowing that your operating system will reliably perform without unexpected crashes or freezes allows you to focus on your work or leisure activities uninterrupted.
For businesses and organizations relying on stable computing environments, Linux offers an ideal solution. Servers running on Linux have long been favored for their exceptional uptime and reliability, ensuring uninterrupted services for critical operations.
In conclusion, Linux’s stability and reliability set it apart from other operating systems. Its open-source nature, modular design, robust security measures, and hardware compatibility contribute to an operating system that rarely crashes or becomes unstable. Whether you are a professional user or an organization seeking a dependable computing environment, Linux’s stability provides the foundation for a smooth and uninterrupted experience.
Open Source
Open Source: Unleashing Creativity and Customization in Linux Installation
One of the most compelling advantages of Linux installation is its open-source nature. Unlike proprietary operating systems like Windows or macOS, Linux allows users to dive into its codebase, modify it, and create their own custom versions of the operating system. This unique feature opens up a world of possibilities, empowering individuals and communities to unleash their creativity and tailor Linux to suit their specific needs.
The open-source philosophy behind Linux encourages collaboration and knowledge sharing. It fosters a vibrant community of developers, enthusiasts, and users who contribute to the growth and improvement of the operating system. With access to the source code, anyone can examine how Linux works under the hood, suggest improvements, fix bugs, or even add new features. This collaborative approach ensures that Linux remains dynamic and constantly evolving.
For those with programming skills or a desire to learn, Linux offers an unparalleled opportunity for personalization. By modifying the codebase, users can create custom versions of the operating system that reflect their unique preferences and requirements. Whether it’s tweaking the user interface, optimizing performance for specific hardware configurations, or adding new functionalities altogether – the possibilities are virtually limitless.
This openness also benefits businesses and organizations seeking tailored solutions for their specific needs. Companies can take advantage of Linux’s open-source nature to develop in-house distributions that align perfectly with their workflows and requirements. They can strip away unnecessary components, add proprietary software if necessary, or integrate specialized tools that enhance productivity.
Furthermore, the open-source nature of Linux fosters innovation by encouraging developers to experiment with new ideas without restrictions imposed by closed ecosystems. This has led to the creation of numerous specialized distributions tailored for specific purposes such as multimedia production, scientific research, web development, cybersecurity, and more. Users can choose from these specialized distributions or build their own by leveraging existing resources within the vast Linux community.
In addition to customization opportunities for individual users and organizations, the open-source nature of Linux also promotes transparency and security. With a large community scrutinizing the codebase, vulnerabilities can be identified and addressed promptly. This collaborative effort ensures that Linux remains a secure and reliable operating system.
In conclusion, the open-source nature of Linux installation sets it apart from other operating systems by providing users with unparalleled freedom to modify, customize, and create their own versions of the OS. This fosters creativity, innovation, and collaboration within the Linux community. Whether you are an individual seeking a personalized computing experience or a business looking for tailored solutions, Linux’s open-source philosophy empowers you to shape your operating system according to your unique vision and requirements. Embrace the world of open-source computing with Linux and unlock endless possibilities for customization and innovation.
Versatility
Versatility: Unleashing the Full Potential of Linux Installation
When it comes to software compatibility, Linux stands out as a true champion. One of the key advantages of Linux installation is its unparalleled versatility. Whether you need to run web servers, databases, games, or multimedia programs, Linux offers a seamless experience without the worry of compatibility issues that often plague other operating systems like Windows or macOS.
In the world of computing, software compatibility can be a major headache. Different versions of software may require specific operating systems or configurations, leading to frustration and limitations for users. However, with Linux, these concerns become a thing of the past.
Linux’s open-source nature allows developers from around the world to collaborate and ensure that their applications are compatible across different distributions. This means that regardless of which Linux distribution you choose, you can rest assured that a wide range of applications will run smoothly on your system.
Web servers are an essential component for hosting websites and web-based applications. With Linux installation, you have access to robust server software like Apache and Nginx which power a significant portion of the internet. These server solutions are tried and tested on Linux and enjoy excellent support from both the community and professional developers.
For those working with databases, Linux offers an array of powerful options such as MySQL, PostgreSQL, and MongoDB. These database management systems are renowned for their stability and performance on Linux platforms. Whether you’re building a small-scale application or managing large datasets, you can rely on Linux to provide a solid foundation for your database needs.
But it doesn’t stop there – gaming enthusiasts also benefit from choosing Linux as their operating system. With advancements in technologies like Proton (part of Steam Play) and Wine (a compatibility layer), running Windows games on Linux has become more accessible than ever before. Additionally, an increasing number of game developers now release their titles directly for Linux users.
Multimedia programs are another area where Linux shines brightly. From professional-grade video editing software like Blender and Kdenlive, to audio production tools like Ardour and Audacity, Linux offers a rich ecosystem of multimedia applications that cater to various creative needs. Whether you’re an artist, musician, or content creator, Linux provides the tools to bring your ideas to life.
Linux’s versatility extends beyond these examples, with countless other applications available for different purposes. The open-source community actively develops and maintains software for a wide range of industries and interests.
So, if you’re tired of compatibility issues and want an operating system that effortlessly supports a diverse range of applications, Linux installation is the answer. Embrace the versatility that Linux offers and unlock new possibilities without being limited by software constraints. Experience the freedom to explore and utilize the vast array of software available on this remarkable platform.
Limited software availability
Limited Software Availability: A Consideration for Linux Installation
Linux, with its numerous advantages and open-source nature, has gained a loyal following among tech enthusiasts and developers. However, it is important to acknowledge that one of the potential drawbacks of Linux installation is the limited availability of certain software applications. This can pose a challenge if you heavily rely on specific programs for work or leisure that are not readily accessible on the Linux platform.
When transitioning from Windows or Mac to Linux, it is crucial to consider whether the software you currently use will be compatible or have suitable alternatives available. While Linux offers a wide range of open-source software options, including office suites, web browsers, media players, and graphic editing tools, there may still be proprietary or niche applications that are not natively supported.
For individuals who heavily rely on industry-specific software or specialized tools for their work, this limitation can be a major hindrance. It may require exploring alternative solutions or finding workarounds to achieve similar functionality. In some cases, virtualization or utilizing compatibility layers like Wine can allow running selected Windows applications on Linux, but this approach does not guarantee seamless performance.
Similarly, if you have specific preferences for popular commercial software packages that are only available for Windows or Mac platforms, adapting to Linux may require adjusting your workflow or seeking alternative open-source equivalents. While many open-source alternatives offer comparable features and functionality, there may still be differences in user interfaces and compatibility with proprietary file formats.
However, it is important to note that the availability of software on Linux has improved significantly over the years. The growing popularity of Linux has encouraged more developers and companies to create cross-platform versions or even exclusive versions for this operating system. Additionally, many web-based applications are platform-independent and can be accessed through browsers on any operating system.
Moreover, the vibrant Linux community actively develops and maintains repositories filled with thousands of free and open-source software packages that cover a wide range of needs. These repositories, combined with package managers like APT or YUM, make it easy to discover and install software directly from trusted sources.
Ultimately, the limited software availability on Linux should be considered in the context of your specific requirements. If you heavily rely on proprietary or niche software that is not available for Linux, it may be worth evaluating whether there are suitable alternatives or workarounds that can meet your needs. However, if you primarily use commonly available applications or are open to exploring new open-source solutions, Linux can provide a secure and powerful platform that fosters creativity and innovation.
When considering a Linux installation, it is crucial to weigh the benefits and drawbacks to make an informed decision that aligns with your computing priorities and requirements.
Installation complexity
Installation Complexity: A Consideration for Linux Installation
While Linux offers numerous benefits and advantages, it is important to acknowledge that the installation process can be complex, especially for those who are unfamiliar with it or lack technical knowledge. This con of Linux installation should be taken into account before diving into the world of open-source operating systems.
Unlike proprietary operating systems that often come pre-installed on computers, installing Linux requires a more hands-on approach. It involves several steps, including choosing a distribution, preparing installation media, partitioning hard drives, and configuring various settings. For someone new to Linux or without much technical expertise, this can be a daunting task.
One of the main reasons behind the complexity of Linux installation is its flexibility and customizability. Unlike other operating systems that come with predetermined settings and configurations, Linux allows users to tailor their system to their exact needs. While this level of customization is undoubtedly beneficial in the long run, it does require additional time and effort during the initial installation process.
Additionally, compatibility issues can arise during installation due to hardware or driver-related challenges. Unlike proprietary systems that are designed for specific hardware configurations, Linux supports a wide range of devices but may require additional steps to ensure all components work seamlessly together. This can involve troubleshooting and searching for compatible drivers or firmware updates.
It is worth noting that many distributions have made significant strides in simplifying the installation process over the years. User-friendly installers and intuitive graphical interfaces have been developed to streamline the experience. Furthermore, online communities and forums provide extensive documentation and support from experienced users who are willing to assist beginners.
Despite these efforts, it is essential to recognize that installing Linux may not be suitable for everyone. If you have limited time or prefer a straightforward installation process without delving into technical details, other operating systems may be more appropriate for your needs.
However, if you are willing to invest time in learning about Linux and enjoy the freedom it offers in terms of customization and open-source software, the initial complexity of installation should not deter you. With patience, perseverance, and access to resources, you can overcome any challenges and unlock the vast potential that Linux provides.
Ultimately, it is essential to weigh the pros and cons of Linux installation before deciding whether it is the right choice for you. Understanding the potential complexities involved will help you make an informed decision based on your technical proficiency, time availability, and desired level of customization.
Security risks
Security Risks in Linux Installation: Mitigating Potential Vulnerabilities
Linux, renowned for its robust security features, is often hailed as a more secure alternative to other operating systems. However, it is important to acknowledge that even Linux installations can pose certain security risks if not handled properly. In this article, we will explore the potential security challenges associated with Linux installation and provide guidance on mitigating these vulnerabilities.
One of the primary security risks in Linux installation arises from improper configuration. While Linux distributions are designed with security in mind, it is crucial to ensure that the system is correctly set up during installation. Failure to do so may leave your system vulnerable to malicious attacks from hackers or viruses.
To mitigate these risks and enhance the security of your Linux installation, consider implementing the following measures:
- Keep Your System Updated: Regularly updating your Linux distribution is essential for maintaining a secure environment. Updates often include patches for known vulnerabilities and security improvements. Enable automatic updates or regularly check for updates and install them promptly.
- Configure Firewall and Security Settings: During installation, make sure to configure your firewall settings appropriately. A firewall acts as a barrier between your system and potential threats by monitoring incoming and outgoing network traffic. Additionally, familiarize yourself with the various security settings available within your chosen distribution and enable them accordingly.
- Install Antivirus Software: While Linux is less prone to viruses compared to other operating systems, it is not immune. Installing reputable antivirus software can help detect and mitigate any potential threats that may arise.
- Secure User Accounts: Create strong passwords for all user accounts on your Linux system, including the root account which has administrative privileges. Use a combination of uppercase letters, lowercase letters, numbers, and special characters to create complex passwords that are difficult to crack.
- Practice Least Privilege Principle: Follow the principle of least privilege by granting users only the necessary permissions required for their tasks. Limiting user privileges reduces the potential impact of a compromised account or malicious software.
- Enable Disk Encryption: Consider enabling disk encryption during the installation process. Disk encryption protects your data by encrypting it, making it unreadable without the appropriate decryption key. This provides an additional layer of security in case of physical theft or unauthorized access to your storage devices.
- Regularly Back Up Your Data: Implement a regular backup strategy to safeguard your important files and data. In the event of a security breach or system failure, having up-to-date backups ensures that you can restore your system and minimize potential data loss.
By following these security practices, you can significantly reduce the risks associated with Linux installation and usage. Remember that maintaining a secure Linux system is an ongoing process that requires vigilance and regular updates. Stay informed about emerging security threats and best practices by actively engaging with the Linux community and related online forums.
While no operating system is entirely immune to security risks, Linux’s open-source nature allows for rapid response to vulnerabilities and an active community dedicated to improving its security measures. With proper configuration and proactive security measures, you can enjoy the benefits of Linux while minimizing potential risks to your system’s integrity and protecting your valuable data.