Linux Accessibility Features: Empowering Users of All Abilities
Linux, the renowned open-source operating system, is not only known for its robustness and versatility but also for its commitment to inclusivity. With a wide range of accessibility features built into its core, Linux strives to empower users of all abilities, ensuring that everyone can fully participate in the digital world.
Let’s explore some of the key accessibility features that make Linux a platform that is accessible to everyone:
- Screen Readers: For individuals with visual impairments, Linux offers screen reader software that converts on-screen text into speech or Braille output. These screen readers enable users to navigate through applications, read documents, and interact with their devices independently.
- Magnification Tools: Linux provides magnification tools that allow users with low vision to enlarge on-screen content for better readability. These tools can be customized to suit individual preferences, offering flexibility and comfort.
- High Contrast Themes: Linux offers high contrast themes that enhance visibility by adjusting colour schemes and contrast levels. This feature benefits users with visual impairments or those who find it challenging to read content in standard colour schemes.
- Keyboard Accessibility: Linux recognises the importance of keyboard accessibility for individuals with motor disabilities or those who prefer not to use a mouse. With customizable keyboard shortcuts and alternative input methods, Linux ensures that all functions can be accessed without relying solely on mouse interactions.
- Assistive Technologies Integration: Linux seamlessly integrates with various assistive technologies such as Braille displays, speech recognition software, and alternative input devices. This interoperability allows users to leverage their preferred assistive technologies while using the Linux operating system.
- On-Screen Keyboards: For individuals who have difficulty using physical keyboards or require an alternative input method, Linux provides on-screen keyboards that can be controlled using a mouse or other input devices like touchscreens or head pointers.
- Closed Captioning and Subtitles: In multimedia applications, Linux supports closed captioning and subtitles, ensuring that individuals with hearing impairments can access audio content through text-based alternatives.
- Internationalization and Localization: Linux is designed to support multiple languages, character sets, and input methods. This feature enables users from diverse linguistic backgrounds to interact with the operating system in their native language, enhancing accessibility for non-English speakers.
- Tactile Feedback: Linux offers tactile feedback options through vibration or haptic feedback for users who benefit from sensory cues while interacting with touchscreens or other input devices.
- Accessibility Documentation and Community Support: The Linux community actively develops and maintains comprehensive documentation on accessibility features, guidelines, and best practices. Additionally, there are dedicated forums and support channels where users can seek assistance or share their experiences with accessibility-related topics.
Linux’s commitment to accessibility extends beyond its core features. The open-source nature of the operating system allows developers worldwide to contribute to improving accessibility further. This collaborative effort ensures that Linux remains at the forefront of accessible computing solutions.
In conclusion, Linux stands as a shining example of how an open-source operating system can embrace inclusivity through its comprehensive suite of accessibility features. By prioritizing the needs of users with disabilities or impairments, Linux empowers individuals of all abilities to navigate the digital landscape independently and participate fully in today’s interconnected world.
Enhancing Linux Accessibility: 5 Tips to Improve User Experience
- Utilise the built-in screen reader to navigate the desktop environment.
- Take advantage of keyboard shortcuts to quickly access various features and functions on your system.
- Use a high contrast theme to make text more visible and easier to read.
- Enable text-to-speech output for audio cues when navigating the interface or performing tasks on your computer.
- Download and install additional accessibility tools such as magnifiers, voice recognition software, and on-screen keyboards for further assistance with using Linux systems.
Utilise the built-in screen reader to navigate the desktop environment.
Utilise the Built-in Screen Reader: Navigating the Linux Desktop with Ease
Linux, the renowned open-source operating system, offers a wealth of accessibility features that empower users of all abilities. One such feature is the built-in screen reader, which provides a powerful tool for individuals with visual impairments to navigate the desktop environment effortlessly.
The screen reader software in Linux converts on-screen text into speech or Braille output, allowing users to interact with applications, read documents, and explore their devices independently. By leveraging this feature, individuals with visual impairments can fully participate in the digital world and make the most of what Linux has to offer.
To utilise the built-in screen reader in Linux and navigate the desktop environment effectively, follow these simple steps:
- Enable Accessibility Settings: Access your system’s accessibility settings by navigating to “Settings” or “System Preferences” in your Linux distribution. Look for an option related to accessibility or assistive technologies.
- Locate Screen Reader Option: Within the accessibility settings, locate and enable the screen reader option. It may be labelled as “Screen Reader,” “Orca,” or something similar depending on your Linux distribution.
- Customize Preferences: Once enabled, you can customize various preferences according to your needs. You can adjust speech rate, volume, pitch, language settings, and more to ensure a comfortable experience.
- Familiarize Yourself with Keyboard Shortcuts: The screen reader software typically comes with a set of keyboard shortcuts designed specifically for navigation purposes. Take some time to familiarize yourself with these shortcuts as they will greatly enhance your ability to move around the desktop efficiently.
- Explore Applications and Documents: With the screen reader activated and preferences set up according to your liking, start exploring applications and documents on your Linux desktop environment. The screen reader will read aloud on-screen content as you navigate through menus, buttons, text fields, and other elements.
- Learn Advanced Features: As you become more comfortable with the basic functionality of the screen reader, consider exploring advanced features. These may include Braille display integration, customized voice profiles, or additional settings to enhance your experience further.
By utilising the built-in screen reader in Linux, individuals with visual impairments can navigate the desktop environment confidently and independently. This feature not only enables access to applications and documents but also fosters a sense of inclusion and empowerment within the Linux community.
Remember, Linux is continuously evolving, and accessibility features are no exception. Stay connected with the Linux community to learn about updates, new features, and improvements that can further enhance your accessibility experience.
In conclusion, embracing the built-in screen reader in Linux opens up a world of possibilities for individuals with visual impairments. By leveraging this powerful tool, users can navigate the desktop environment effortlessly and engage with their devices on their own terms. Linux’s commitment to accessibility continues to make it a platform that truly values inclusivity and empowers users of all abilities.
Take advantage of keyboard shortcuts to quickly access various features and functions on your system.
Unlocking Efficiency: Harness the Power of Keyboard Shortcuts in Linux Accessibility
In the world of Linux accessibility, efficiency and convenience are paramount. One simple yet powerful tip to enhance your experience is to take full advantage of keyboard shortcuts. These shortcuts allow you to swiftly access various features and functions on your system, empowering you to navigate with ease and accomplish tasks more efficiently.
Keyboard shortcuts are designed to eliminate the need for repetitive mouse movements, making them especially valuable for users with motor disabilities or those who prefer keyboard-centric workflows. By memorising a few key combinations, you can unlock a world of possibilities at your fingertips.
Here are some ways keyboard shortcuts can enhance your Linux accessibility experience:
- Streamlined Navigation: Instead of reaching for the mouse or trackpad, use keyboard shortcuts to quickly jump between applications, switch virtual desktops, or navigate through menus and tabs. This not only saves time but also reduces strain on your hands and wrists.
- Application Control: With keyboard shortcuts, you can effortlessly control various aspects of applications without interrupting your workflow. From opening new windows or tabs to closing them, switching views or modes, and even executing specific commands within applications – all can be achieved with a few key presses.
- Text Manipulation: Keyboard shortcuts offer a range of text manipulation options that can boost productivity when working with documents or text editors. Cut, copy, paste, undo/redo actions become lightning-fast operations that don’t require lifting your hand from the keyboard.
- System Management: Take charge of system management tasks using keyboard shortcuts. From locking or logging out of your session to adjusting volume levels, brightness settings, or even launching specific system tools – all these actions can be executed swiftly without leaving the comfort of your keyboard.
- Accessibility-Specific Shortcuts: Linux distributions often provide accessibility-specific keyboard shortcuts that cater to users’ unique needs. These may include activating screen readers, enabling high contrast themes, adjusting magnification levels, or toggling specific accessibility features on and off. Familiarise yourself with these shortcuts to customise your Linux accessibility experience.
Remember, keyboard shortcuts may vary depending on your Linux distribution and desktop environment. Take some time to explore the available shortcuts within your system’s settings or refer to documentation specific to your setup.
To become proficient in using keyboard shortcuts effectively, start by identifying the tasks you perform most frequently. Then, search for corresponding shortcuts or customise them to suit your preferences. Practice regularly until they become second nature.
By embracing the power of keyboard shortcuts, you can streamline your Linux accessibility experience, save time, reduce physical strain, and unlock a new level of efficiency in navigating your system. So why not give it a try? Start exploring the world of keyboard shortcuts today and witness how they transform the way you interact with Linux.
Use a high contrast theme to make text more visible and easier to read.
Enhance Readability with High Contrast Themes on Linux
In the world of technology, accessibility is a crucial aspect that should never be overlooked. Linux, the renowned open-source operating system, understands this importance and offers a range of accessibility features to cater to users with diverse needs. One such feature that can significantly improve readability is the use of high contrast themes.
When it comes to reading text on a screen, some individuals may face challenges due to visual impairments or difficulties in perceiving certain colours. This is where high contrast themes come into play. By adjusting the colour schemes and contrast levels, these themes make text more visible and easier to read for everyone.
To enable a high contrast theme on your Linux system, follow these simple steps:
- Open the “Settings” menu: Depending on your Linux distribution and desktop environment, you can usually find the settings menu in the taskbar or by searching for “Settings” in the application launcher.
- Look for “Appearance” or “Accessibility”: In the settings menu, navigate to the section that handles appearance or accessibility options. The naming might vary depending on your Linux distribution.
- Select a high contrast theme: Within the appearance or accessibility settings, you should find an option to choose different themes. Look for a high contrast theme among the available options and select it.
- Apply and test: Once you have selected a high contrast theme, apply it to see how it affects your system’s appearance. Take some time to navigate through different applications and documents to ensure that text readability has improved.
By using a high contrast theme, you can make text stand out more prominently against its background, reducing eye strain and enhancing readability for individuals who may have difficulty distinguishing between colours or shades.
It’s worth noting that Linux offers various high contrast themes with different colour combinations and levels of contrast. Feel free to experiment with different options until you find one that suits your preferences best.
Remember, accessibility is not just about accommodating individuals with specific needs; it’s about creating an inclusive environment for everyone. By utilising the high contrast themes available on Linux, you can make text more visible and ensure that no one is left behind when it comes to accessing and enjoying digital content.
Linux’s commitment to accessibility features like high contrast themes showcases its dedication to empowering users of all abilities. So go ahead, explore the accessibility settings on your Linux system, and discover how small adjustments can make a significant difference in enhancing readability and improving the overall user experience.
Enable text-to-speech output for audio cues when navigating the interface or performing tasks on your computer.
Enhance Your Linux Experience with Text-to-Speech Output
Linux, the versatile open-source operating system, offers a range of accessibility features that empower users of all abilities. One such feature is text-to-speech output, which provides audio cues to aid navigation and task execution on your computer. Enabling this functionality can greatly enhance the accessibility and usability of your Linux system.
Text-to-speech output allows Linux to convert on-screen text into spoken words, providing valuable auditory feedback as you interact with the interface or perform various tasks. Whether you have visual impairments or simply prefer audio cues, this feature can make your Linux experience more inclusive and efficient.
To enable text-to-speech output on your Linux system, follow these simple steps:
- Open the System Settings: Depending on your Linux distribution and desktop environment, you can usually find the System Settings in the main menu or by right-clicking on the desktop.
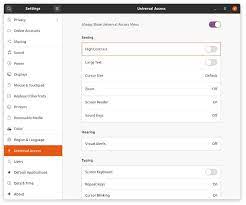
- Navigate to Accessibility Settings: Look for an option labeled “Accessibility” or “Universal Access” within the System Settings menu. Click on it to access the accessibility settings panel.
- Enable Text-to-Speech: Within the accessibility settings panel, locate the option for text-to-speech output or screen reader functionality. Toggle it on to enable this feature.
- Customize Speech Preferences (Optional): Depending on your preferences and needs, you may have additional options to customize speech settings such as voice selection, speech rate, or volume control. Feel free to explore these settings and adjust them according to your preferences.
Once enabled, text-to-speech output will provide audio cues when navigating through menus, interacting with applications, or performing tasks such as opening files or executing commands. You’ll hear spoken feedback that helps you understand what’s happening on-screen without relying solely on visual information.
Text-to-speech output is particularly beneficial for individuals with visual impairments who rely heavily on auditory feedback while using their computers. However, it can also be advantageous for users who prefer audio cues or those who want to multitask and receive information audibly.
By enabling text-to-speech output, Linux ensures that users of all abilities can interact with their systems more effectively and independently. This feature exemplifies the commitment to inclusivity that lies at the core of the Linux community.
So, why not take advantage of this powerful accessibility feature? Enable text-to-speech output on your Linux system today and enjoy a more accessible and user-friendly computing experience.
Enhancing Linux Accessibility: Additional Tools for a Seamless Experience
Linux, the renowned open-source operating system, is already equipped with a range of built-in accessibility features. However, for users who require additional assistance, Linux offers the flexibility to download and install various accessibility tools. These tools further enhance the accessibility of Linux systems, ensuring a seamless and personalised experience for users of all abilities.
One such category of additional tools includes magnifiers. For individuals with low vision, magnification software can be a game-changer. By enlarging on-screen content, these tools improve readability and make it easier to navigate through applications and documents. With customizable settings and preferences, users can tailor the magnification levels according to their specific needs.
Voice recognition software is another valuable tool available for Linux systems. This technology allows individuals with motor disabilities or those who prefer voice commands to interact with their devices using spoken words. By converting speech into text or executing commands based on voice input, this software enables hands-free operation and enhances independence.
On-screen keyboards are yet another useful addition for users who have difficulty using physical keyboards or require alternative input methods. These virtual keyboards can be controlled using a mouse or other input devices like touchscreens or head pointers. They provide an accessible means of text input and enable users to interact with their Linux systems without relying solely on physical keyboards.
To access these additional accessibility tools, users can explore various software repositories specific to their Linux distribution. These repositories contain a wide range of applications that cater to different accessibility needs. By searching for keywords such as “magnifiers,” “voice recognition,” or “on-screen keyboards,” users can discover and install the tools that best suit their requirements.
It’s important to note that while these additional tools may not be pre-installed in Linux distributions by default, they are readily available for download from trusted sources within the Linux community. Users can rely on community support forums and documentation resources to find recommendations for reliable accessibility tools and gain insights from others who have successfully integrated them into their Linux systems.
By embracing the availability of these additional accessibility tools, users can further enhance their Linux experience and tailor it to their specific needs. Whether it’s through magnification for improved visibility, voice recognition for hands-free operation, or on-screen keyboards for alternative input methods, Linux ensures that users of all abilities can engage with their systems comfortably and efficiently.
In conclusion, Linux’s commitment to accessibility extends beyond its built-in features. By providing the option to download and install additional accessibility tools, Linux empowers users to customize their experience according to their unique requirements. This flexibility reinforces Linux’s position as an inclusive operating system that strives to make technology accessible to everyone.