Beginner’s Guide: Yocto Tutorial for Novice Developers
Welcome to the Yocto Tutorial for Beginners
If you are new to embedded Linux development and looking for a powerful tool to build custom Linux distributions, then Yocto is the perfect solution for you. Yocto is an open-source project that provides tools and templates to create custom Linux distributions tailored to specific hardware platforms.
Getting Started with Yocto
To begin your journey with Yocto, the first step is to set up your development environment. You will need to install the necessary dependencies, including Git, Python, and other required tools. Once you have everything set up, you can proceed with downloading the Yocto Project source code and setting up your build environment.
Creating Your First Image
One of the key features of Yocto is its ability to create custom Linux images with minimal effort. By using recipes and layers, you can define the components and configurations of your image. You can specify which packages, libraries, and configurations should be included in your custom image.
Customizing Your Build
Yocto provides flexibility in customizing your build process. You can modify existing recipes or create your own recipes to add new software packages or make configuration changes. This allows you to tailor your Linux distribution to meet the specific requirements of your project.
Building and Deploying Your Image
Once you have defined your image configuration, you can start the build process using BitBake, the core build tool of Yocto. BitBake will fetch the necessary source code, compile packages, and generate the final image based on your specifications. After a successful build, you can deploy the image onto your target hardware for testing.
Exploring Advanced Features
As you become more familiar with Yocto, you can explore advanced features such as creating custom layers, integrating external software components, and optimizing performance for embedded systems. The possibilities are endless with Yocto as you delve deeper into its capabilities.
Beginner’s Guide to the Yocto Project: Top 9 FAQs Explained
- What is the Yocto Project and why should I use it?
- How do I set up my development environment for Yocto?
- What are layers and recipes in Yocto, and how do they work?
- How can I create a basic image using Yocto?
- What tools are required to start working with the Yocto Project?
- How do I customise a Linux distribution using Yocto?
- Can I add new software packages to my Yocto build, and how?
- What is BitBake, and what role does it play in the Yocto Project?
- Are there any resources or communities for beginners learning Yocto?
What is the Yocto Project and why should I use it?
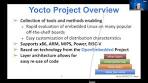
The Yocto Project is a powerful open-source framework that provides tools and templates for building custom Linux distributions specifically designed for embedded systems. Beginners often ask, “What is the Yocto Project and why should I use it?” The Yocto Project offers a comprehensive set of tools that streamline the process of creating custom Linux images tailored to specific hardware platforms. By using Yocto, developers can easily define the components, configurations, and software packages included in their custom distributions. This level of flexibility and customization makes the Yocto Project an ideal choice for those looking to create efficient and optimised Linux distributions for their embedded projects.
How do I set up my development environment for Yocto?
Setting up your development environment for Yocto is a crucial first step for beginners embarking on their journey into embedded Linux development. To begin, you will need to ensure that you have all the necessary dependencies installed on your system, including tools like Git, Python, and other required packages. Once you have set up these dependencies, the next step involves downloading the Yocto Project source code and configuring your build environment. By following these initial setup steps meticulously, you can lay a solid foundation for diving into the world of custom Linux distributions with Yocto.
What are layers and recipes in Yocto, and how do they work?
In the realm of Yocto development, understanding the concepts of layers and recipes is fundamental for beginners. Layers in Yocto serve as a way to organize and manage different components, configurations, and recipes within a project. They allow developers to modularize their customizations, making it easier to maintain and update the build environment. On the other hand, recipes define how individual software packages should be built and included in the final image. They contain metadata that specifies dependencies, source URLs, compilation instructions, and other essential details needed for building the desired software component. By leveraging layers and recipes effectively, developers can create custom Linux distributions tailored to their specific requirements with ease and flexibility in the Yocto framework.
How can I create a basic image using Yocto?
Creating a basic image using Yocto is a fundamental step for beginners in embedded Linux development. To create a basic image, you can start by defining the components and configurations of your image using recipes and layers. By specifying which packages, libraries, and configurations should be included in your custom image, you can tailor it to meet your project’s requirements. Once you have defined your image configuration, you can initiate the build process using BitBake, the core build tool of Yocto. BitBake will handle fetching the necessary source code, compiling packages, and generating the final image based on your specifications. This process allows beginners to quickly create a basic image that can be deployed onto their target hardware for testing and further development.
What tools are required to start working with the Yocto Project?
To begin working with the Yocto Project, several essential tools are required to set up your development environment effectively. Some of the key tools include Git, a version control system used to manage the source code of the Yocto Project. Python is another crucial tool needed for running various scripts and tools within the Yocto environment. Additionally, you will need to install BitBake, the core build tool of Yocto, which orchestrates the compilation and packaging process. Other necessary tools include a terminal emulator for running commands, as well as text editors for modifying configuration files and recipes. By ensuring you have these tools installed and configured correctly, you can kickstart your journey into creating custom Linux distributions with the Yocto Project.
How do I customise a Linux distribution using Yocto?
Customising a Linux distribution using Yocto involves leveraging its powerful tools and methodologies to tailor a Linux image to specific requirements. With Yocto, users can define the components, configurations, and packages that make up their custom distribution. By utilising recipes and layers, one can add or remove software components, adjust configurations, and fine-tune the build process to create a bespoke Linux distribution that perfectly aligns with their project needs. Yocto’s flexibility and modularity empower beginners to customise every aspect of their Linux distribution, making it an ideal choice for those seeking a tailored embedded Linux solution.
Can I add new software packages to my Yocto build, and how?
In the realm of Yocto tutorial for beginners, a frequently asked question revolves around the possibility of adding new software packages to a Yocto build. The answer is a resounding yes – Yocto allows users to incorporate additional software packages seamlessly into their custom builds. By creating or modifying recipes within the Yocto environment, developers can specify which packages to include, along with any necessary dependencies and configurations. This flexibility empowers users to expand the functionality of their Yocto-based systems by integrating new software components tailored to their specific project requirements.
What is BitBake, and what role does it play in the Yocto Project?
BitBake is a powerful build tool that plays a central role in the Yocto Project, particularly in the context of creating custom Linux distributions. It is designed to automate the build process by fetching source code, configuring packages, compiling software components, and generating the final image according to the specified configurations. BitBake uses recipes and metadata to define the tasks required to build software packages and images, making it a crucial component in building and customizing Linux distributions with Yocto. By leveraging BitBake’s capabilities, users can efficiently manage dependencies, optimize builds, and streamline the development process when working with the Yocto Project.
Are there any resources or communities for beginners learning Yocto?
For beginners embarking on their Yocto journey, a common question often arises: Are there any resources or communities available to support my learning process? Fortunately, there is a wealth of resources and vibrant communities dedicated to helping beginners navigate the world of Yocto. Online forums, official documentation, tutorial websites, and community-driven blogs offer valuable insights, troubleshooting tips, and step-by-step guides to assist newcomers in understanding the intricacies of Yocto. Additionally, joining Yocto-specific communities and engaging with like-minded individuals can provide a supportive environment for sharing knowledge, seeking advice, and fostering collaboration among beginners and experienced users alike.